2nd Wessex Brigade, Royal Field Artillery
The II (or 2nd) Wessex Brigade was a howitzer unit of the Royal Field Artillery in Britain's Territorial Force (TF) that was formed on the Isle of Wight in 1908. It served in India and the Middle East during World War I, one of its batteries being captured at the Siege of Kut in Mesopotamia in 1916, and another seeing active service in the Third Afghan War of 1919. Although reformed after the war, the unit was broken up in 1927.
| II Wessex (H) Brigade, RFA 55th (Wessex) Field Brigade, RA | |
|---|---|
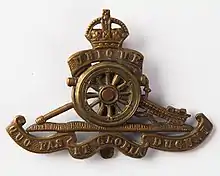
 Cap Badge of the Royal Artillery | |
| Active | 1 April 1908–September 1927 |
| Country | |
| Branch | |
| Type | Artillery Brigade |
| Role | Field Artillery |
| Part of | Wessex Division 6th (Poona) Division |
| Garrison/HQ | Ryde, Isle of Wight |
| Engagements | Battle of Amara Battle of Nasiriyah Battle of Es Sinn Battle of Ctesiphon Siege of Kut Third Afghan War |
Origin
When the Volunteer Force was subsumed into the Territorial Force (TF) in 1908 under the Haldane Reforms, the 2nd Hampshire Royal Garrison Artillery (Volunteers) was reorganised to provide two Royal Field Artillery (RFA) brigades for the TF's new Wessex Division: the I (or 1st) Wessex Brigade at Southsea (from HQ and Nos 1–8 Companies) and the IV (or 4th) Wessex Brigade on the Isle of Wight (from Nos 10 and 11 Companies).[lower-alpha 1] Generally, the fourth RFA brigade in each TF division was equipped with howitzers, and the Wessex was no exception. However, by 1910 seniority had been asserted,[lower-alpha 2] and the IV Wessex was redesignated II Wessex (Howitzer) Brigade, RFA, with the following organisation:[1][2][3][4][5][6]
- Headquarters (HQ) at Ryde, Isle of Wight (IoW)[7]
- 4th Hampshire (Howitzer) Battery at Zig-Zag Road, Ventnor, IoW[8][9]
- 5th Hampshire (Howitzer) Battery at Freshwater, IoW,[10] with a drill station at Drill Hall Road, Newport, IoW[9][11]
- 2nd Wessex (Howitzer) Ammunition Column at Ryde[7]
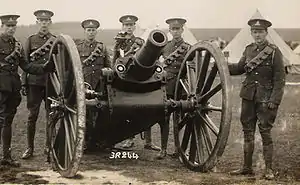
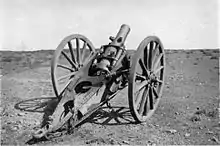
Each TF howitzer battery was equipped with four obsolescent 5-inch howitzers.[12] On the eve of World War I the brigade was commanded by Lieutenant-Colonel H.L. Powell, a retired Regular Army major.[3]
World War I
Mobilisation

On 29 July 1914 the Wessex Division was on Salisbury Plain carrying out its annual training camp when 'precautionary orders' were received, and next day the division took up emergency war stations in Somerset, Devon and Cornwall. The order to mobilise arrived on the evening of 4 August. Between 10 and 13 August the division concentrated on Salisbury Plain and began war training.[12][13]
On 24 September, at the special request of the Secretary of State for War, Earl Kitchener of Khartoum the Wessex Division accepted liability for service in British India to relieve the Regular Army units there for service on the Western Front. The division's infantry battalions and artillery brigades (without their brigade ammunition columns) embarked at Southampton on 8 October and were convoyed to Bombay, disembarking on 9 November. Each battery went ashore with 5 officers and 140 other ranks. The battalions and batteries were immediately distributed to garrisons across India, and the Wessex Division never saw service as a whole, though it was formally numbered the 43rd (1st Wessex) Division in 1915.[12]
Meanwhile, those men who had been left behind, together with the recruits who were flooding in, formed reserve or 2nd Line units, the titles of which were the same as the original, but distinguished by a '2/' prefix. The 2/II Wessex Brigade formed immediately after the 1st Line sailed for India. Recruitment and training for the 2nd Wessex Division proceeded so quickly that on 25 November it was decided to send that to India as well, and most units embarked on 12 December 1914, becoming the 45th (2nd Wessex) Division in 1915. However, the 2/II Wessex Brigade was one of the units left behind in England.[2][14][15][16]
1/II Wessex (H) Brigade
On arrival in India the 1/II Wessex (H) Brigade was stationed at Lucknow and reverted to peacetime conditions. By early 1915 the need was growing for troops to be sent to various theatres of war, and the first units of the 1st Wessex Division to go on active service were 1/5th Hampshire (H) Battery and 1/4th Battalion Hampshire Regiment, which were sent to Mesopotamia in March.[6][12][13][17]
1/5th Hampshire (H) Battery

The battery landed at Basra on 23 March 1915 with 12th Indian Division to join Indian Expeditionary Force 'D'. Soon afterwards it transferred to 6th (Poona) Division, which had been in action against Turkish forces in Mesopotamia since the previous November. In April 1915 the column under Maj-Gen Charles Townshend began its advance up the Tigris. At the Battle of Amara on 31 May, 6th (Poona) Division captured a series of hills, powerfully supported by heavy guns firing from river barges and the howitzers of 1/5th Hampshire Bty firing from Fort Snipe, though the battery was out of range when the infantry took the last hill. The attack was resumed the next day, with the guns concentrating on Abu Aran, and Amara fell on 2 June.[18][19][20] 12th Indian Division then began to advance up the Euphrates towards Nasiriyah. When it ran into serious opposition in 14 July, reinforcements were sent across from the Tigris, including a section of 1/5th Hampshire Bty. The renewed attack went in on 24 July, with the howitzers firing on enemy trenches at Thorneycroft Point. As the infantry advanced the guns lifted in front of them; by 13.00 the enemy were in full retreat, driven out once more by the guns. 1/5th Hampshire Bty then returned to the Tigris.[21]
Battle of Es Sinn
On 22 August Townshend was ordered to advance further up the Tigris to capture Kut al-Amara. He reached Sannaiyat in mid-September and then brought up his guns, including 1/5th Hampshire Bty. The concentration was complete by 25 September, and he launched his attack with two columns, either side of the river. A section of 1/5th Hampshire Bty accompanied the smaller Column B on the north side. On the night of 27/28 September Townshend switched the bulk of 6th (Poona) Division from the south to the north side, to make the main attack against the northern redoubt at 08.45. The attacking infantry were given covering fire by 1/5th Hampshire and other batteries as they advanced over open ground to take the redoubt. The howitzers were then pushed up to fire in support of the attack on the southern redoubt. By mid-afternoon the exhausted infantry were closing in on the final objective when a Turkish counter-attack came in. All guns engaged this new threat, and it was driven back. By dawn on 29 September the Turkish troops were streaming back towards Baghdad. They halted to prepare new defences at Ctesiphon, 40 miles (64 km) from Kut and only 16 miles (26 km) in front of Baghdad, while Townshend followed up as far as Aziziya.[22]
Battle of Ctesiphon
After a logistical build-up, Townshend was authorised to resume his march on Baghdad on 14 November, his force including 1/5th Hampshire Bty, which consisted of 3 officers, 108 British other ranks and 41 Indian other ranks.[23][24] By 19 November he was at Lajj, but the Turkish position at Ctesiphon blocked his route. He attacked on the morning of 22 November with four columns, 1/5th Hampshire Bty accompanying Column A, which was to make the decisive attack on the redoubt known as 'Vital Point' or VP after the other columns had made preparatory and flanking attacks. Column A launched its assault at 09.00; 1/5th Hampshires' howitzers and a battery of field guns had been bombarding VP for some time, and now brought down such fire on the objective that the Turks could not withstand it, and the infantry advanced right up to the bursting shells to take the objective by 10.00. At 13.00 Turkish guns attacked the column with concentrated fire, causing heavy casualties, but by 13.30 they had lost their entire front line and Column A was pressing on to the second line. A Turkish counter-attack was seen coming in, but the guns swung onto this new target and stopped it at a range of 1,000 yards (910 m). Townshend called off his attacks at 17.00. when night fell.[12][20][25][26]
Next morning it became clear how costly the victory had been in terms of infantry casualties, and Townshend had to adopt a defensive posture: 1/5th Hampshire Bty was posted around 'Water Redoubt'. Townshend's force threw back Turkish attacks all day and by the morning of 24 November both sides were too exhausted to continue the fight (1/5th Hampshire Bty had lost 1 man killed, 1 officer, 2 British and 1 Indian other ranks wounded). Townshend had no offensive capacity left, and (unlike the Turks) no reinforcements in prospect. Water and ammunition were also short. He fell back to Lajj and then Aziziya, and by 29 November he was at Umm-at-Tubal, where he formed a camp with his rear to the river. On 1 December he put in a sharp attack on the gathering Turks, with rapid artillery fire that completely disorganised them while he resumed his retreat. On 3 December his exhausted force struggled into Kut al-Amara.[20][27][28]
Siege of Kut
The first Turkish shells fell on the town on 6 December, beginning a long siege. 1/5th Hampshire Bty was stationed with the bulk of the artillery at the Brick Kiln, near the fort where the artillery observation posts (OPs) were positioned. Heavy artillery bombardment of the town and probing infantry attacks began on 8 December and continued until 13 December. The main Turkish attack was made on 24 December following a pre-dawn bombardment that switched onto the Fort at 07.00, putting some guns out of action and cutting the telephone from the OPs. The bombardment suddenly stopped at 11.00 and a massive Turkish infantry attack was made against the breaches blown in the walls of the fort. After bitter fighting, with every gun in the British garrison firing, the assault was driven out. A second attempt by moonlight at 20.00 was also halted, the heavy guns and howitzers firing Lyddite shells into the Turkish trenches whose position was precisely known. After a third attack at 02.30 on 25 December, the Turks made no further attempt to take Kut by storm. From now on the town was blockaded and shelled while Turkish attention was concentrated on preventing the British relieving force getting through from Basra.[20][29][30]
By April 1916 the situation in Kut was desperate. Casualties from the continual shellfire were mounting and food was running out, despite attempts to air-drop supplies to the garrison. The artillery horses had been killed for food before the end of March, though many of the Indian troops refused to eat them. The last attempt to break through failed on 22 April and Townshend was authorised to negotiate a surrender. The Turks demanded unconditional surrender so 1/5th Hampshire Bty blew up their guns and remaining ammunition on 28 April before marching into captivity the following day under their battery commander, Maj H.G. Thomson.[12][20][31][32]
The 1/5th Hampshire Bty and a company of the 1/4th Hampshire Regiment had been the only TF units in the besieged garrison. There are no exact figures, but is believed that about one-third of the prisoners died in captivity before the end of the war.[20][33]
1/4th Hampshire (H) Battery
In September 1915 1/4th Hampshire (H) Battery was sent from India to Aden, where it landed and joined the Aden Expeditionary Force on 13 September.[6][12][13] The port of Aden had been threatened by a Turkish force but after some action in June and July 1915 it simply watched the British garrison. No attempt to attack was made by either side for the rest of the war.[34]

1/4th Hampshire Bty returned to India on 14 August 1916. It left its 5-inch howitzers behind for 2/1st Devonshire Battery from 2/IV Wessex Brigade that relieved it, and on arrival in India it was rearmed with modern 18-pounder field guns and ceased to be a howitzer battery. In 1917 it was redesignated 1089 Battery RFA, and was brought up to an establishment of six guns when it was joined by a section from 2/2nd Devonshire Battery.[6]
1/II Wessex Brigade was renumbered as CCXVI (216) Brigade during 1916, although it consisted only of the returned 1089 (1/4th Hampshire) Bty. However, by April 1917 it was joined by 1097 Bty from CCXXV Bde (the former 2/1st Hampshire Bty from 2/I Wessex Bde) and 1104 Bty from CCXXVII Bde (the former 2/1 Wiltshire Bty from 2/III Wessex Bde). By July 1918 1104 Bty had transferred on to CCXVIII Bde.[2][6][12][35][36]
After the end of World War I 1089 Battery was still serving in India when the Third Afghan War broke out. It accompanied the 47th Mobile Indian Brigade during the brief campaign.[12][6][13]
2/II Wessex (H) Brigade
2nd Wessex Division's artillery had been scattered around southern England while forming. After the rest of the division sailed for India 2/II Wessex Brigade was sent to the Isle of Wight in early 1915. In January 1916 it moved to Winchester and was numbered CCXXVI (226) Bde. Later it became part of 'E' Reserve Battery, training gunners for service overseas. It was at Bordon Camp from October 1916 to October 1918, and then at Larkhill until demobilisation in January 1919.[2][14][16]
Postwar
The 2nd Wessex Brigade was reformed in 1920 with the following organisation:[2][3][37]
- Brigade HQ at Drill Hall, Ryde, IoW
- 5th Hampshire Battery
- 6th Hampshire Battery
- 7th Hampshire Battery – from the former 3rd Wessex Brigade
- 1st Wiltshire Battery – from the former 3rd Wessex Brigade
When the TF was reconstituted as the Territorial Army the following year, the brigade was renumbered 55th (Wessex) Brigade, RFA with the following organisation:[2][3][37]
- Brigade HQ at Drill Hall, Ryde, IoW
- 217 (Hampshire) Bty at Drill Hall, Freshwater, IoW
- 218 (Hampshire) Bty at Drill Hall, Bournemouth
- 219 (Hampshire) Bty (Howitzer) at Newport, IoW
- 220 (Wiltshire) Bty at Drill Hall, Swindon
The 1st (Ryde) Cadet Corps was affiliated to the brigade. The brigade was designated a Field Brigade in 1924 when the RFA was merged into the Royal Artillery.
Disbandment
However, in 1927 the brigade was broken up: the Hampshire elements transferred to form two batteries in the 95th (Hampshire Yeomanry) Field Brigade while the Wiltshire elements joined the West Somerset Yeomanry batteries from 94th (Somerset and Dorset Yeomanry) Field Brigade to form a new 55th (Wessex) Field Brigade with headquarters at Taunton.[2][3][37][38]
Footnotes
- No 9 Battery remained with the Royal Garrison Artillery as the Wessex Division's heavy battery.
- The Hampshire RGA had ranked 2nd in the precedence of Volunteer Artillery: the I and II Wessex brigades derived from it therefore ranked 2nd and 3rd in the TF.
Notes
- Frederick, p. 682.
- Litchfield, p. 93.
- Monthly Army List, various dates.
- London Gazette, 20 March 1908.
- London Gazette, 14 October 1910.
- 43rd Divisional Artillery at Long, Long Trail.
- Ryde at Drill Hall Project
- Ventnor at Drill Hall Project
- Hampshire & Isle of Wight at Great War Centenary Drill Halls.
- Freshwater at Drill Hall Project
- Newport at Drill Hall Project
- Becke, pp. 43–8.
- 43rd (1st Wessex) Division at Long, Long Trail.
- Becke, pp. 55–60.
- 45th (2nd Wessex) Division at Long, Long Trail.
- 45th Divisional Artillery at Long, Long Trail.
- Farndale, p. 354.
- Farndale, pp. 203–8.
- Moberly, Appendix VIII, p. 477.
- Perry, pp. 76–8.
- Farndale, pp. 209–10.
- Farndale, pp. 211–3.
- Farndale, p. 214.
- Moberly, pp. 34–9; Appendix IX, p. 480; Appendix XI, p. 483.
- Farndale, pp. 215–7.
- Moberly, pp. 63, 67, 69–70, 79–80, 85–9.
- Farndale, pp. 217–9.
- Moberly, pp. 90–101, 111–8; Appendix XII, p. 485.
- Farndale, pp. 221–3.
- Moberly, pp. 164–73, 176–81.
- Farndale, pp. 225–5.
- Moberly, pp. 163, 439–41, 449–52, 456–8.
- Moberly, p. 460.
- Farndale, p. 357.
- Farndale, p. 382.
- Frederick, p. 694.
- Frederick, p. 516.
- Litchfield, pp. 95, 209.
References
- Maj A.F. Becke,History of the Great War: Order of Battle of Divisions, Part 2a: The Territorial Force Mounted Divisions and the 1st-Line Territorial Force Divisions (42–56), London: HM Stationery Office, 1935/Uckfield: Naval & Military Press, 2007, ISBN 1-847347-39-8.
- Gen Sir Martin Farndale, History of the Royal Regiment of Artillery: The Forgotten Fronts and the Home Base 1914–18, Woolwich: Royal Artillery Institution, 1988, ISBN 1-870114-05-1.
- J.B.M. Frederick, Lineage Book of British Land Forces 1660–1978, Vol II, Wakefield, Microform Academic, 1984, ISBN 1-85117-009-X.
- Norman E.H. Litchfield, The Territorial Artillery 1908–1988 (Their Lineage, Uniforms and Badges), Nottingham: Sherwood Press, 1992, ISBN 0-9508205-2-0.
- Brig-Gen F.J. Moberly, History of the Great War: The Campaign in Mesopotamia, Vol II, London: HM Stationery Office, 1924/Imperial War Museum and Battery Press, 1997, ISBN 978-089839269-2.
- F.W. Perry, History of the Great War: Order of Battle of Divisions, Part 5b: Indian Army Divisions, Newport, Gwent: Ray Westlake, 1993, ISBN 1-871167-23-X.