Francis Harvey
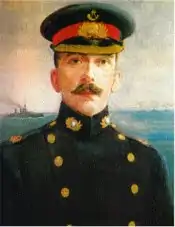
Major Francis John William Harvey, VC (29 April 1873 – 31 May 1916) was an officer of the British Royal Marine Light Infantry during the First World War. Harvey was posthumously awarded the Victoria Cross, the highest military award for gallantry in the face of the enemy given to British and Commonwealth forces, for his actions at the height of the Battle of Jutland. A long-serving Royal Marine officer descended of a military family, during his career Harvey became a specialist in naval artillery, serving on many large warships as gunnery training officer and gun commander. Specially requested for HMS Lion, the flagship of the British battlecruiser fleet, Harvey fought at the battles of Heligoland Bight, Dogger Bank and Jutland.
Francis John William Harvey | |
|---|---|
 Francis Harvey, VC | |
| Born | 29 April 1873 Upper Sydenham, Kent |
| Died | 31 May 1916 (aged 43) HMS Lion, North Sea |
| Allegiance | |
| Service/ | |
| Years of service | 1892–1916 |
| Rank | Major |
| Battles/wars | First World War • Battle of Heligoland Bight • Battle of Dogger Bank • Battle of Jutland † |
| Awards | Victoria Cross |
At Jutland, Harvey, although mortally wounded by German shellfire, ordered the magazine of Q turret on the battlecruiser Lion to be flooded. This action prevented the tons of cordite stored there from catastrophically detonating in an explosion that would have destroyed the vessel and all aboard her. Although he succumbed to his injuries seconds later, his dying act may have saved over a thousand lives and prompted Winston Churchill to later comment: "In the long, rough, glorious history of the Royal Marines there is no name and no deed which in its character and consequences ranks above this".[1]
Gunnery expert
Harvey was born in Upper Sydenham, Kent, the son of Commander John William Francis Harvey, RN and Elizabeth Edwards Lavington Harvey née Penny. At age 11 in 1884, Harvey moved with his family to Southsea and he attended Portsmouth Grammar School, achieving excellent academic results and showing proficiency in languages and debating.[2] Harvey was descended from a military family; his great-great-grandfather John Harvey had been killed in the Glorious First of June in 1794 and his great-grandfather Admiral Sir Edward Harvey, GCB, RN and grandfather Captain John Harvey of the 9th Regiment of Foot were also prominent military figures.[3]
After leaving school, Harvey chose a military career and was accepted by both the Royal Military College, Sandhurst and the Royal Naval College, Greenwich for officer training. Choosing the latter school as a Royal Marines officer cadet, Harvey graduated in 1892 and the following year was made a full lieutenant, joining HMS Wildfire for his first seagoing commission.[4] After just a year at sea, Harvey was back on shore attending gunnery courses at HMS Excellent, qualifying in 1896 as an instructor first class in naval gunnery.[3] Harvey was appointed to the cruiser HMS Phaeton when she was commissioned at Devonport on 8 June 1897 for service on the Pacific Station. In 1898, whilst on the Phaeton, he was thanked by the Admiralty for an report he rendered on San Diego Harbour. Returning home the same year, Harvey was given the position of Assistant Instructor for Gunnery at Plymouth Division. During this period, Harvey married Ethel Edye and had one son, John.[1]
Between 1898 and 1904 Harvey spent much of his time attached to the Channel Fleet, aboard HMS Edgar and HMS Diadem, practising and instructing in gunnery. On 28 January 1900 he was promoted to captain.[6] In 1903 he was posted aboard HMS Royal Sovereign, the first of a string of big ship appointments teaching gunnery to the heavy units of the Channel Fleet. By 1909, Harvey had served on HMS Duke of Edinburgh, HMS St George and the new battlecruiser HMS Inflexible. In 1910 Harvey became Instructor of Gunnery at Chatham Dockyard and the following year was promoted to major,[7] a report on the gunnery school commenting "Degree of efficiency in Gunnery Establishment at Chatham is very high both as regards general training and attention to detail. Great credit is due all concerned particularly to Major F.J.W. Harvey, the I of G".[3]
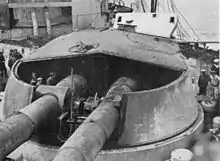
The strength of this report subsequently gained Harvey a position as senior marine officer aboard HMS Lion, the 27,000 ton flagship of the British battlecruiser fleet. Lion had eight 13.5-inch guns and Harvey was stationed in Q turret directing their operation and fire. Under her new commander, Rear-Admiral David Beatty, Harvey served as the senior marine officer on board into the First World War, his first military campaign.[3]
First World War
.jpg.webp)
Harvey did not have to wait long to see action, seeing combat for the first time at the Battle of Heligoland Bight just weeks into the war. On 28 August 1914, Lion and her squadron of HMS Queen Mary and HMS Princess Royal, swept into the Heligoland Bight where German and British cruiser forces were already engaged in a bitter struggle.[8] One German cruiser had already been sunk by the time Beatty's force arrived, but the German flagship SMS Cöln and cruiser SMS Ariadne were surprised in the fog and destroyed by heavy calibre shells from Beatty's battlecruisers. German Konteradmiral Leberecht Maass and over 1,000 of his sailors were killed, Harvey's guns scoring several hits on the cruisers.[3]
Six months later, Harvey's guns again caused severe damage to a German force at the Battle of Dogger Bank. Over the previous months, a German battlecruiser squadron under Rear-Admiral Hipper had crossed the North Sea and bombarded British coastal towns on several occasions. On 24 January 1915 another attempt was made, but this time British signals analysts had detected the German movement and using this information the Admiralty dispatched Beatty's force to intercept and destroy them. Beatty and Hipper's squadrons collided at 09:00 and during the engagement that followed, Lion was left exposed by mis-communication between the ships, which led to HMS Tiger engaging the wrong ship, leaving SMS Moltke uncovered and so able to fire more accurately. The British flagship was hard pressed until one of Lion's shots penetrated one of Seydlitz's turrets.[1] A huge explosion destroyed the neighbouring turret as well and killed 160 men, the German flagship only surviving due to the actions of sailor Wilhelm Heidkamp, who wrenched open the water valves to the magazines despite them glowing red hot.[9]
Lion was badly damaged in the action by shells from the passing SMS Derfflinger and with her engines failing, dropped back to engage the already sinking SMS Blücher. Misread signals resulted in the rest of the British fleet returning to support Lion in this task, allowing the rest of the battered German fleet to retire as the British destroyed the hapless Blücher and 792 of her crew.[10] Following the battle, Harvey remained aboard Lion at Rosyth for the whole of 1915 and the first five months of 1916, continuing his gunnery training and preparations for major fleet action. His preparations came to fruition on the last day of May, when the British fleet sailed to engage the main body of the German High Seas Fleet at the Battle of Jutland.
Just after Dogger Bank, Harvey had written to a fellow RMLI officer in HMS Orion describing his experiences:
As to the fighting in a turret, one doesn't suffer any discomfort and my chief feeling has been of 'curiosity' mixed with the idea that whoever else is coming to grief, oneself will be all right. I am under no delusion though, that if a proj [projectile] does hit one's turret it will in all probability come right in and send one to glory.[11]
Jutland
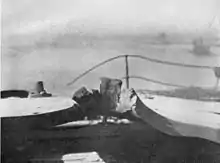
| "The armoured roof of Q turret had been folded back like an open sardine tin, thick yellow smoke was rolling up in clouds from the gaping hole and the guns were cocked up in the air awkwardly". |
| Lieutenant W. S. Chambers, HMS Lion's bridge.[12] |

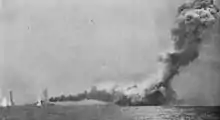
Beatty's battlecruisers led the British fleet in its attack, casting south into the North Sea to find the enemy during the afternoon of 31 May 1916. At 14:15, scouting cruisers spotted the German vanguard and Beatty closed to attack the enemy with his main force. Given time to prepare, Hipper was ready for Beatty with his battlecruisers in line to face Beatty's approaching ships with their full broadsides. Hipper was also encouraged by the main German battleship fleet under Vice-Admiral Reinhard Scheer, which was steaming northwards close behind him. At 15:45 Beatty came within range of the German fleet and the vanguards engaged one another with their opening fusillades.[12] As the two squadrons closed, the Germans found the range better and faster than the British, who were silhouetted against the sun. As a result, German shells pounded the British ships while the German ships remained untouched for the first 10 minutes of the engagement.[12] During this stage of the battle Lion was hit by nine shells from SMS Lützow.[13] One shell at 16:00 struck the right upper corner of the left hand gun port at the junction of the face plate and the roof, and punched a piece of the 9-inch face plate into the turret before detonating, blowing off the armoured roof of the turret and starting a fire, which a damage control party working from outside the turret fought to put out.[14]

The initial explosion killed or wounded everyone stationed in the gun house itself.[15] Harvey, despite severe wounds and burns, gave orders down the voice pipe for the magazine doors to be closed and the magazine compartments to be flooded, an action which would prevent the cordite in the magazines detonating.[16] Turning to his sergeant, the one man still standing, Harvey instructed him to proceed to the bridge and give a full report to the ship's captain Ernle Chatfield (a standard drill in damage exercises).[17] The sergeant went immediately to the bridge and notified the captain of Harvey's actions before being taken below to have his wounds dressed.

As soon as the turret had been hit the captain had ordered Q magazine doors closed and the magazine flooded, the order passing to the Transmitting Station below the armoured deck where Stoker 1st Class William Yeo was entrusted with passing the order on. The magazine was consequently flooded and locked up within minutes of the hit. However the cordite charges which had fallen down from gun house after the hit were not removed to safety, and there were still ready charges in the working chamber. A large number of crewmen still remained in the shell room, magazine handing room and working chamber. The fire which was thought to have been put out after the hit on the turret gained strength and ignited the remaining cordite charges, setting off a large explosion at 16:28 which killed the turret crewmen, the flame of the explosion reaching as high as the top of the ship's masts. Even with the precautions taken in hand, the magazine doors were later found to be severely buckled – only the seawater in the magazine behind it prevented the blast reaching inside.[18] Other ships of the battlecruiser fleet were less lucky; at about the same time as Harvey's death, HMS Indefatigable was torn to pieces by a series of magazine explosions that claimed 1,013 lives and just minutes after that HMS Queen Mary exploded "like a puffball" in one huge column of grey smoke, killing 1,275 sailors.[19] Hours later during the main battlefleet engagement, Rear-Admiral Horace Hood's flagship HMS Invincible was destroyed with 1,032 lives. All three ships were lost as the result of magazine explosions similar to the one narrowly avoided on Lion.[19]
Remembrance
Harvey's charred corpse was taken from the wreckage of Q turret in the aftermath of battle and buried at sea with full honours alongside the other 98 fatal casualties Lion had suffered.[1] His bravery in the face of certain death did not go unnoticed; he was mentioned by name in Admiral Jellicoe's post-battle dispatch and he was posthumously awarded the Victoria Cross.[20] Harvey's widow Ethel was presented with the award at Buckingham Palace by King George V on 15 September 1916. His medal group was later loaned to the Royal Marines Museum, Eastney Barracks by his son Lieutenant-Colonel John Malcolm Harvey of the King's Regiment in 1973. Harvey's name is inscribed on the Chatham Naval Memorial to those with no known grave, administered by the Commonwealth War Graves Commission.[21]
Victoria Cross citation
Major Francis John William Harvey, R.M.L.I. Recommended for posthumous Victoria Cross.
Whilst mortally wounded and almost the only survivor after the explosion of an enemy shell in "Q" gunhouse, with great presence of mind and devotion to duty ordered the magazine to be flooded, thereby saving the ship. He died shortly afterwards.
London Gazette, 15 September 1916[22]
See also
Notes
- Snelling, p. 108
- Snelling, p. 106
- Snelling, p. 107
- "No. 26428". The London Gazette (Supplement). 1 August 1893. p. 4356.
- "No. 27164". The London Gazette. 13 February 1900. p. 1000.
- "No. 28463". The London Gazette (Supplement). 7 February 1911. p. 953.
- Bennett, p. 131
- Bennett, p. 143
- Bennett, p. 144
- Holloway, p. 46
- Snelling, p. 93
- Campbell, p. 349
- Campbell, pp. 64–65
- Snelling, p. 94
- Through the Hawse Pipe, Captain Alexander Grant, Retrieved 20 November 2007. Some accounts, including Perrett, suggest that both of Harvey's legs had been torn off by the shell blast, but Snelling indicates that he could still walk during these final seconds. The full extent of his injuries are unclear. One of the officers who helped recover his body, Lieutenant-Colonel F.R. Jones, wrote to the Marines' journal The Globe and Laurel in October 1956 that Harvey was "very badly burnt…[but] not dismembered in any way."
- Snelling, p. 95
- Campbell, pp. 65–66
- Snelling, p.96
- "No. 29751". The London Gazette (Supplement). 15 September 1916. p. 9070.
- Harvey, Major Francis John William, Commonwealth War Graves Commission, Retrieved 20 November 2007
- "No. 29751". The London Gazette (Supplement). 15 September 1916. p. 9067.
References
- Arthur, Max (2004). Symbol of Courage, A History of the Victoria Cross. Sidgwick & Jackson. ISBN 978-0-28-307351-9.
- Bennett, Geoffrey (1968). Naval Battles of the First World War. Penguin. ISBN 0-14-139087-5.
- Campbell, N.J.M. (2000). Jutland: An Analysis of the Fighting. New York: The Lyons Press. ISBN 1-55821-759-2.
- Harvey, David (1999). Monuments to Courage. Naval & Military Press Ltd. ISBN 1-84342-356-1.
- Holloway, S.M. (2006). From Trench and Turret: Royal Marines' Letters and Diaries 1914–1918. London: Constable and Robinson Ltd. ISBN 1-84529-321-5.
- Perrett, Bryan (2003). For Valour. Weidenfeld & Nicolson. ISBN 0-297-84662-0.
- Snelling, Stephen (2002). VCs of the First World War: The Naval VCs. Sutton Publishing. ISBN 0-7509-1395-9.
- "Through the Hawse Pipe, Battle of Jutland Memoir". Captain Alexander Grant. Retrieved 20 November 2007.
- "Harvey, Francis John William". Commonwealth War Graves Commission. Retrieved 20 November 2007.
- "Major Harvey". Royal Marines Commando, royalnavy.mod.uk. Archived from the original on 10 December 2007. Retrieved 5 December 2007.
- "Holders of the Victoria Cross: Buried at Sea". The Victoria Cross: Britain's Highest Award for Gallantry. Retrieved 20 November 2007.