1973 Hardie-Ferodo 1000
The 1973 Hardie-Ferodo 1000 was the 14th running of the Bathurst 1000 touring car race. This was the first race to be held under the new metricised distance of 1000 kilometres, rather than the 500 miles previously contested. It was held on 30 September 1973 at the Mount Panorama Circuit just outside Bathurst. The race was open to cars eligible to the locally developed CAMS Group C touring car regulations with four engine capacity based classes and it was the 3rd round of the 1973 Australian Manufacturers' Championship.
| 1973 Hardie-Ferodo 1000 | |||
| Previous: | 1972 | Next: | 1974 |
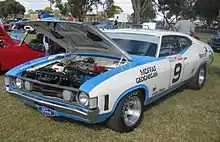
Allan Moffat claimed his third win in the event and the long-awaited first win for Ian Geoghegan driving a Ford Falcon GT. It was also the seventh and final win for the factory Ford Australia racing team. Peter Brock and Doug Chivas dropped from contention after their Holden Torana ran out of fuel, forcing Chivas to push the car uphill along the pit lane to make it to the Holden Dealer Team pit bay. Brock and Chivas finished on the same lap as Moffat and Ian Geoghegan, ahead of their teammates Colin Bond and Leo Geoghegan, also on the same lap, in third position.
Class structure
Class A
The smallest class was for under 1300cc engine capacity. It was made up of Datsun 1200, Fiat 128, Honda Civic, Morris Cooper S and Renault R8.
Class B
The under two litre class saw a mix of Alfa Romeo GTV 2000, Datsun 180B, Ford Escort, Mazda RX-3 and Subaru 1400 GSR.
Class C
The under three litre class featured 2.8 litre Holden Torana and Mazda RX-2.
Class D
For cars over three litres of engine capacity, the class consisted of Chrysler Valiant Charger, Ford Falcon, Holden Monaro and the larger engined Toranas.
Race
Pole sitter Goss got off to a great start leading the Falcons of Moffat, French and Gibson from Brock's Torana. Gibson went out early with engine trouble and French made an unscheduled stop. This left Goss to make his first stop on lap 43 with a 40 second lead over Moffat and Brock, the later pair hardly separated by more than a few seconds until Moffat spun at Griffins on lap 44, losing about 20 seconds before making his first stop on lap 45 where he handed over to Geoghegan. Brock stopped on lap 54 and handed the car over to Chivas, whom they hoped could run the car long enough to only make one more pitstop in the race and one less than the Falcons, despite Brock reporting that the fuel gauge on the car had failed.[1] Bond momentarily took the lead of the race until making his stop on lap 61, well past a third distance proving that the Torana could do the race on just two stops.
Despite Moffat's spin and the Torana having a minute shorter pitstop than the Falcon, Geoghegan made up the difference to Chivas - taking second place from brother Leo Geoghegan (driving with Bond) and then retaking the lead of the race on lap 78. Bartlett (driving with early leader Goss) pitted on the same lap but Goss would be involved in a collision with Garth's overturned Torana and pitted for repairs on lap 105 putting them out of contention. Geoghegan was able to build a lead over Chivas before stopping and handing the car back to Moffat. Chivas held a 1'40" advantage over Moffat some time after the stop and was given the instruction from his pit board to "get max laps" only to run out of fuel on the top of the mountain and coast back to the pit entry. However with the start of pitlane being uphill Chivas had to climb out and push the car, he also had to do this unassisted on penalty of disqualification until he himself had gotten the car far enough for his team to be allowed to assist. Moffat and Leo Geoghegan both passed Chivas as he strained to slowly push the car against the gradient after a long stint at the wheel.[2]
Moffat made his final stop on lap 123 of just 1'24", which was over a minute faster than his first, and was able to resume still leading Bond's Torana and cruise home to victory, the only danger being the #35 Mazda RX-2 rolling over ahead of him on his final lap. Any chance of Brock putting pressure back on Moffat was thwarted by the need to make a 15 second stop for more fuel on lap 147. He did however regain second place when Bond's left rear tyre blew across the top and he had to make an unscheduled stop of 30 seconds. Brock would have his own tyre failure with the right rear blowing out on the final lap but he continued to the finish at pace knowing the car only had to survive the remainder of that lap.[3]
Although the best surviving highlight reel of the day available now[4] clearly promotes the narrative of a certain Holden victory being lost due to miscalculation (Chivas running out of fuel) this is questionable at best with the benefit of hindsight (the film is credited to General Motors and their sponsors at the time). Clearly Moffat slowed significantly when no longer challenged for the race lead, so while it is possible he may have had his own trouble if pressed harder, it is certainly a hollow claim that because Brock and Chivas were able to finish within a lap of Moffat and Geoghegan despite running out of fuel they lost a certain race win. The race pace of the Torana's may have been compromised by trying to run to only two stops with Geoghegan able to make up about two and a quarter minutes over Chivas in his stint alone. Brock was the only driver to not haemorrhage time to the race winner but never got close to achieving the fuel economy required for his strategy to work, falling short on both his stints by as much as 16 laps. Brock obviously would have had to slow significantly more to complete the required laps. The real victim of this narrative is the incredible effort by John Goss not being a bigger part of the story. Despite Goss building his race car in his spare time[5] he was able to take pole position, set a new lap record and lead the factory entered cars by 40 seconds at his first pitstop. If not for some small exhaust issue, and a collision with a car that had illegally re-joined the race (after being towed), the 1973 Hardie-Ferodo 1000 may well have been celebrated as a Goss/Bartlett victory in the David versus Goliath style.
Top 10 Qualifiers
| Pos | No | Team | Driver | Car | Qual |
|---|---|---|---|---|---|
| Pole | 5 | McLeod Ford | Ford XA Falcon GT Hardtop | 2:33.4 | |
| 2 | 1 | Holden Dealer Team | Holden LJ Torana GTR XU-1 | 2:34.4 | |
| 3 | 9 | Ford Motor Company of Australia | Ford XA Falcon GT Hardtop | 2:34.5 | |
| 4 | 4 | Bryan Byrt Ford | Ford XA Falcon GT Hardtop | 2:35.3 | |
| 5 | 24 | Holden Dealer Team | Holden LJ Torana GTR XU-1 | 2:35.4 | |
| 6 | 7 | Ron Hodgson Racing | Holden LJ Torana GTR XU-1 | 2:36.3 | |
| 7 | 6 | Ford Motor Company of Australia | Ford XA Falcon GT Hardtop | 2:38.2 | |
| 8 | 19 | Cessnock Motor Works | Holden LJ Torana GTR XU-1 | 2:38.2 | |
| 9 | 2 | Bob Jane Racing | Holden LJ Torana GTR XU-1 | 2:39.3 | |
| 10 | 3 | Pacific Film Laboratories | Holden LJ Torana GTR XU-1 | 2:40.5 | |
Results
| Pos | Class | No | Team | Drivers | Car | Laps | Qual Pos |
|---|---|---|---|---|---|---|---|
| 1 | D | 9 | Ford Australia | Ford XA Falcon GT Hardtop | 163 | 3 | |
| 2 | D | 1 | Holden Dealer Team | Holden LJ Torana GTR XU-1 | 163 | 2 | |
| 3 | D | 24 | Holden Dealer Team | Holden LJ Torana GTR XU-1 | 163 | 5 | |
| 4 | D | 2 | Bob Jane Racing | Holden LJ Torana GTR XU-1 | 161 | 9 | |
| 5 | D | 10 | Nixdorf | Holden LJ Torana GTR XU-1 | 154 | 11 | |
| 6 | D | 21 | Chrysler Valiant Charger R/T E49 | 150 | 18 | ||
| 7 | D | 15 | Ford XA Falcon GT Hardtop | 150 | 19 | ||
| 8 | B | 49 | A.F. & M. Beninca | Alfa Romeo GTV 2000 | 149 | 23 | |
| 9 | B | 45 | Mazda RX-3 | 144 | 36 | ||
| 10 | C | 34 | Mazda RX-2 | 144 | 36 | ||
| 11 | D | 31 | Chrysler Valiant Charger R/T E49 | 143 | 29 | ||
| 12 | C | 37 | John Palmer Motors | Mazda RX-2 | 143 | 39 | |
| 13 | B | 44 | Ford Escort Twin Cam Mk.I | 143 | 32 | ||
| 14 | B | 41 | Datsun Racing Team | Datsun 180B SSS | 143 | 40 | |
| 15 | A | 56 | Datsun Racing Team | Datsun 1200 | 142 | 46 | |
| 16 | A | 55 | Fiat 128SL | 142 | 43 | ||
| 17 | C | 33 | W.H. Motors | Holden LC Torana GTR XU-1 | 141 | 28 | |
| 18 | D | 3 | Pacific Film Laboratories | Holden LJ Torana GTR XU-1 | 141 | 10 | |
| 19 | B | 39 | Alfa Romeo GTV 2000 | 140 | 27 | ||
| 20 | D | 29 | Peter Kilmore | Holden LJ Torana GTR XU-1 | 138 | 41 | |
| 21 | A | 66 | Morris Cooper S | 136 | 50 | ||
| 22 | A | 54 | Honda Civic | 134 | 53 | ||
| 23 | B | 38 | Subaru 1400 GSR | 133 | 55 | ||
| 24 | A | 63 | Honda Civic | 131 | 52 | ||
| 25 | A | 68 | Morris Cooper S | 131 | 56 | ||
| 26 | A | 67 | Morris Cooper S | 131 | 57 | ||
| 27 | A | 64 | Renault R8 Gordini | 130 | 49 | ||
| 28 | B | 43 | Ford Escort Twin Cam Mk.I | 129 | 44 | ||
| 29 | B | 48 | Mazda RX-3 | 126 | 34 | ||
| 30 | A | 59 | Datsun 1200 | 125 | 58 | ||
| DNF | C | 35 | James Mason Motors | Mazda RX-2 | 142 | 38 | |
| DNF | D | 8 | Muirs Motors (Ashfield) | Holden HQ Monaro GTS | 130 | 20 | |
| DNF | B | 50 | Chesterfield Racing Team | Ford Escort Twin Cam Mk.I | 116 | 54 | |
| DNF | D | 5 | McLeod Ford | Ford XA Falcon GT Hardtop | 110 | 1 | |
| DNF | D | 4 | Bryan Byrt Ford | Ford XA Falcon GT Hardtop | 91 | 4 | |
| DNF | A | 57 | Morris Cooper S | 89 | 51 | ||
| DNF | D | 17 | G. Ryan | Holden LJ Torana GTR XU-1 | 89 | 14 | |
| DNF | D | 26 | Ray Thackwell | Holden LJ Torana GTR XU-1 | 89 | 22 | |
| DNF | A | 58 | Morris Cooper S | 77 | 45 | ||
| DNF | C | 36 | McLeod Kelso Lee | Holden LC Torana GTR | 75 | 31 | |
| DNF | D | 12 | Dustings of Burwood | Holden LJ Torana GTR XU-1 | 64 | 21 | |
| DNF | B | 42 | Ford Escort Twin Cam Mk.I | 64 | 25 | ||
| DNF | D | 27 | Chrysler Valiant Charger R/T E49 | 62 | 17 | ||
| DNF | D | 30 | John Stoopman | Holden LJ Torana GTR XU-1 | 61 | 30 | |
| DNF | D | 23 | Bob Holden Motors | Holden LJ Torana GTR XU-1 | 58 | 16 | |
| DNF | A | 53 | Honda Civic | 56 | 48 | ||
| DNF | D | 16 | Chrysler Valiant Charger R/T E49 | 45 | 13 | ||
| DNF | D | 19 | Cessnock Motor Works | Holden LJ Torana GTR XU-1 | 42 | 8 | |
| DNF | D | 13 | Bruce McPhee | Holden LJ Torana GTR XU-1 | 41 | 15 | |
| DNF | B | 47 | Ford Escort Twin Cam Mk.I | 36 | 33 | ||
| DNF | A | 60 | Morris Cooper S | 27 | 42 | ||
| DNF | D | 20 | Chas Tierney | Holden LJ Torana GTR XU-1 | 25 | 37 | |
| DNF | D | 11 | Chrysler Valiant Charger R/T E49 | 17 | 12 | ||
| DNF | D | 6 | Ford Australia | Ford XA Falcon GT Hardtop | 17 | 7 | |
| DNF | B | 40 | Brian Foley Motors | Alfa Romeo GTV 2000 | 5 | 24 | |
| DNF | D | 7 | Ron Hodgson Racing | Holden LJ Torana GTR XU-1 | 4 | 6 | |
| DNF | A | 66 | Morris Cooper S | 3 | 47 | ||
| DNF | D | 25 | D & P Traders | Holden LJ Torana GTR XU-1 | 3 | 26 | |
| DNS | D | 14 | Freds Treads | Holden LJ Torana GTR XU-1 | |||
| DNS | D | 28 | B. Nitschke | Holden LJ Torana GTR XU-1 | |||
| DNS | D | 32 | Gosford Motors | Holden LJ Torana GTR XU-1 |
Statistics
- Pole Position - #5 John Goss - 2:33.4
- Fastest Lap - #5 John Goss - 2:34.8 - Lap 2 (lap record)
- Average Speed - 137 km/h
- Race Time - 7:20:06.8
References
- "1973 FIRST HARDIE-FERODO 1000 Bathurst -15'17"". YouTube. 28 December 2016. Retrieved 5 October 2020.
- "1973 FIRST HARDIE-FERODO 1000 Bathurst - 19'12"". YouTube. 28 December 2016. Retrieved 5 October 2020.
- "1973 FIRST HARDIE-FERODO 1000 Bathurst - 26'12"". YouTube. 28 December 2016. Retrieved 5 October 2020.
- "1973 FIRST HARDIE-FERODO 1000 Bathurst". YouTube. 28 December 2016. Retrieved 5 October 2020.
- "Legends: John Goss". TradeUniqueCars.com.au. Retrieved 5 October 2020.
- Greenhalgh, David; Thomas B. Floyd; Bill Tuckey (2000). Australia's Greatest Motor Race 1960-1999. Chevron Publishing Group. pp. 194–201 & 461. ISBN 1-875221-12-3.
- Noonan, Aaron (2018). Holden At Bathurst - The Cars: 1963-2017. AN1 Media Pty. Ltd. pp. 45–52.