Battle of Tulkarm
The Battle of Tulkarm took place on 19 September 1918, beginning of the Battle of Sharon, which along with the Battle of Nablus formed the set piece Battle of Megiddo fought between 19 and 25 September in the last months of the Sinai and Palestine Campaign of the First World War. During the infantry phase of the Battle of Sharon the British Empire 60th Division, XXI Corps attacked and captured the section of the front line nearest the Mediterranean coast under cover of an intense artillery barrage including a creeping barrage and naval gunfire. This Egyptian Expeditionary Force (EEF) victory over the entrenched Ottoman Eighth Army, composed of German and Ottoman soldiers, began the Final Offensive, ultimately resulting in the destruction of the equivalent of one Ottoman army, the retreat of what remained of two others, and the capture of many thousands of prisoners and many miles of territory from the Judean Hills to the border of modern-day Turkey. After the end of the battle of Megiddo, the Desert Mounted Corps pursued the retreating soldiers to Damascus, six days later. By the time an Armistice of Mudros was signed between the Allies and the Ottoman Empire five weeks later, Aleppo had been captured.
| Battle of Tulkarm | |||||||
|---|---|---|---|---|---|---|---|
| Part of the Middle Eastern theatre of World War I | |||||||
 German photograph of Tulkarm taken in 1915 | |||||||
| |||||||
| Belligerents | |||||||
|
| |||||||
| Commanders and leaders | |||||||
|
|
| ||||||
| Units involved | |||||||
|
XXI Corps's 60th Division guns of the Destroyers HMS Druid and HMS Forester with most of the 383 land-based guns Desert Mounted Corps | |||||||
During the Battle of Tulkarm the 60th Division, (XXI Corps) advanced to cut the front line Ottoman trenches. They were supported as they moved forward by artillery fire, which lifted and crept forward while the infantry advanced to capture Nahr el Faliq. Their advance forced the Ottoman Eighth Army to withdraw, and the continuing attack resulted in the capture of Tulkarm, and the Eighth Army headquarters. The tactic of the infantry attack covered by creeping artillery fire, was so successful that the front line was quickly cut and the way cleared for the British Empire cavalry divisions of Desert Mounted Corps to advance northwards up the Plain of Sharon. The cavalry aimed to capture the Ottoman lines of communication in the rear of the two German and Ottoman armies being attacked in the Judean Hills. By 20 September these cavalry divisions reached the rear, completely outflanked and almost encircled the Ottoman Seventh and Eighth Armies during the Battle of Nazareth, Capture of Afulah and Beisan, Capture of Jenin and Battle of Samakh. Meanwhile, British Empire infantry divisions on the right of the 60th Division advanced to successfully attack the German and Ottoman trench lines along their front line at the Battles of Tabsor and Arara. The Ottoman Seventh Army headquarters at Nablus was subsequently attacked and captured during the Battle of Nablus.
Background
By July 1918, it was clear that the German Spring Offensive on the Western Front, which had forced the postponement of offensive plans in Palestine, had failed, resulting in a return to trench warfare on the Western Front. This coincided with the approach of the campaigning season in the Middle East.[1][2]
General Edmund Allenby, commander of the Egyptian Expeditionary Force (EEF) was "very anxious to make a move in September" when he expected to capture Tulkarm and Nablus, (the headquarters of the Ottoman Seventh and Eighth Armies), the road to Jisr ed Damieh and Es Salt.[3] "Another reason for moving to this line is that it will encourage both my own new Indian troops and my Arab Allies."[3]
By September 1918, the front line held by the EEF began virtually at sea level at a point on the Mediterranean coast about 12 miles (19 km) north of Jaffa, just north of Arsuf, ran about 15 miles (24 km) south-east across the Plain of Sharon, then east over the Judean Hills for about 15 miles (24 km) rising to a height of 1,500–2,000 feet (460–610 m) above sea level. From the Judean Hills the front line fell steeply to 1,000 feet (300 m) below sea-level in the Jordan Valley, where it continued for about 18 miles (29 km) to the Dead Sea and the foothills of the Mountains of Gilead/Moab.[4][5]
Prelude
British plans and preparations
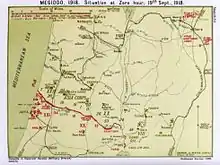
On the first quarter of the front line which stretched 15 miles (24 km) across the Plain of Sharon from the Mediterranean Sea, the XXI Corps 35,000 infantry, Desert Mounted Corps' 9,000 cavalry and 383 artillery pieces were preparing for the attack. On the remaining three quarters of the front line stretching to the Dead Sea, 22,000 infantry, 3,000 mounted troops and 157 artillery pieces of the XX Corps and Chaytor's Force were deployed facing the Seventh and Fourth Ottoman Armies.[6]
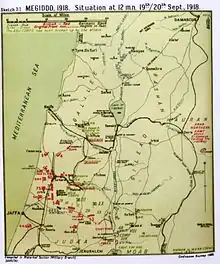
"Concentration, surprise, and speed were key elements in the blitzkrieg warfare planned by Allenby."[7] The Battle of Sharon was to begin with an attack on the 8 miles (13 km) long front line, between the branch of the Jaffa-Jerusalem railway running north from Lydda towards Tulkarm (cut at the front line) and the Mediterranean, where Allenby massed three mounted divisions behind three of the XXI Corps' infantry divisions, supported by 18 densely deployed, heavy and siege batteries. Together, the five infantry divisions of the XXI Corps, commanded by Lieutenant General Edward Bulfin, had a 4.4–to–1 advantage in total troop numbers and three times the defenders' heavy artillery.[8][9][10]
The objective of the 60th Division, (XXI Corps), which consisted of three British Indian Army infantry battalions for each British battalion, was to attack in "overwhelming strength at the selected point",[11] supported by the "greatest possible weight of artillery",[11] to cut the German and Ottoman front line and create a gap sufficiently wide for the "great mass" [11] of mounted troops to break through, passing quickly, "unimpaired by serious fighting",[11] to the rear of the Seventh and Eighth Armies in the Judean Hills.[11]
After the cavalry breakthrough on the coast, the XXI Corps would advance to capture the headquarters of the Ottoman Eighth Army at Tulkarm together with sections of the lateral railway line in the Judean Hills between Tulkarm and Nablus, a branch of the Jezreel Valley railway, which supplied the two Ottoman Armies, including the important railway junction at Messudieh in the Judean Hills.[3][12] The infantry divisions were to continue their attack by swinging north–east, pivoting on their right to push the defenders back out of their trenches away from the coast and back into the Judean Hills towards Messudieh.[13]
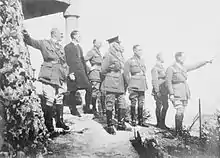
The XXI Corps' 60th Division would advance north-east towards Tulkarm, while on their right the 3rd (Lahore), the 7th (Meerut) and the 75th Divisions, each division consisting of one British infantry and three British Indian Army infantry battalion per brigade, would attack the Tabsor defences, while the all British 54th (East Anglian) Division and the Détachement Français de Palestine et de Syrie (DFPS) defended and pivoted on the Rafat salient. Further to the right, the XX Corps would begin the Battle of Nablus in the Judean Hills in support of the main attack by the XXI Corps, by advancing to capture the Seventh Army headquarters at Nablus and blocking the main escape route from the Judean Hills to the Jisr ed Damieh.[14][15][16][17][Note 1]
Together, these attacks would force the enemy to retreat down the main line of communication along the road and branch line of the Jezreel Valley railway, which ran alongside each other to pass through Jenin, and across the Esdrealon Plain 50 miles (80 km) away, and on to Damascus. The plain was also the site of the important communication hubs at Afulah and Beisan and here thousands would be captured by the cavalry of Desert Mounted Corps as they advanced to their objectives of Afulah (4th Cavalry Division), the Yildirim Army Group's headquarters at Nazareth (5th Cavalry Division) and Jenin (Australian Mounted Division) on the Esdraelon Plain.[4][18][19][20]
The successful exploitation of the infantry attack on the coast by Desert Mounted Corps' cavalry's breakthrough depended on the mounted corps occupying the Esdraelon Plain (also known as the Jezreel Valley and the ancient Plain of Armageddon), 40 miles (64 km) behind the Ottoman front line. The site of important Ottoman communications hubs at Afulah and Beisan, the Esdraelon Plain links the Plain of Sharon with the Jordan Valley. Together, these three lowlands form a semicircle round the positions held by the Ottoman Seventh and Eighth Armies in the Judean Hills. If the Esdraelon Plain could be captured swiftly, the entire Ottoman army west of the Jordan could be captured.[4][21]
British Empire deployments
The 60th Division commanded by Major General J. S. M. Shea, was to fight on the ancient battlefield between Arsuf and Nahr el Faliq, where in 1191 King Richard defeated Saladin and avenged Hattin.[5][22] Shea's infantry division was to advance to establish a bridgehead across Nahr el Faliq and create a gap in the front line for the cavalry. Then the 60th Division was to advance north-east to capture Tulkarm and cut the railway line east of it.[5][22]
By the evening of 18 September, the 60th Division was deployed with the 180th Brigade in the lead and the 181st Brigade some 16 miles (26 km) from Tulkarm, with the 179th Brigade in reserve. The recently formed 5th Light Horse Brigade was attached to the 60th Division, although it was positioned for its initial advance directly towards Tulkarm, behind the 7th (Meerut) Division. Also attached to the 60th Division were the 13th Pontoon Park, which would build a pontoon crossing of Nahr el Faliq; the 102nd Brigade Royal Garrison Artillery; and the 2nd Light Armoured Motor Battery, who were to join the division at Tulkarm.[22][Note 2]
German and Ottoman forces and preparations
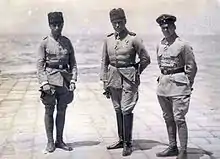
In August 1918, the Central Powers' Yildirim Army Group commanded by Otto Liman von Sanders consisted of 40,598 frontline infantrymen organised into twelve divisions defending a 56 miles (90 km) long front. They were armed with 19,819 rifles, 273 light and 696 heavy machine guns. The high number of machine guns reflects the Ottoman Army's new tables of organization and the high machine gun component of the German Asia Korps.[23] Another estimate of this fighting strength was 26,000 infantry, 2,000 mounted troops and 372 guns.[24] Yet another estimate is that on a 15 miles (24 km) front extending from the Mediterranean coast westwards, the German and Ottoman force may have deployed 8,000 infantry supported by 130 guns, with the remaining 45 miles (72 km) of front defended by 24,000 German and Ottoman soldiers and 270 guns.[6]
Cevat Pasha's Eighth Army of 10,000 soldiers supported by 157 guns, with its headquarters at Tulkarm, held a line from the Mediterranean coast just north of Arsuf to Furkhah in the Judean Hills. This army was organised into the XXII Corps (7th, 20th and 46th Divisions) and the "Asia Corps", also known as the "Left Wing Group", commanded by the German Colonel Gustav von Oppen[25][26][27][28] (16th and 19th Divisions, three German battalion groups of the German "Pasha II" detachment), with the 2nd Caucasian Cavalry Division in reserve. The Asia Corps linked the Eighth Army's XXII Corps on the coast with the Seventh Army's III Corps further inland, facing units of the British XX Corps. (See the Battle of Nablus for a description of this fighting.)[29]
The 7th, 19th and 20th Divisions held the shortest frontage in the entire Yildirim Army Group. The 7th and 20th Divisions, together held a total of 7.5 miles (12.1 km) of trenches; the 7th Division held 4.3 miles (6.9 km) nearest the coast while the 20th Division held 3.1 miles (5.0 km) and the Asia Corps' 19th Division held 6.2 miles (10.0 km) of trenches further inland, with the 46th Division in reserve 7.5 miles (12.1 km) from the front line, near the Eighth Army's headquarters at Tulkarm.[30][31]
These divisions were some of the most highly regarded fighting formations in the Ottoman Army; in 1915 the 7th and 19th Divisions had fought as part of Esat Pasa's III Corps at Gallipoli.[Note 3] The 20th Division had also fought towards the end of the Gallipoli campaign and served for a year in Galicia fighting against Russians on the eastern front. This regular army division, which had been raised and stationed in Palestine, was sometimes referred to as the Arab Division.[32]
The XXII Corps was supported by the majority of the Yildirim Army's heavy artillery for counter battery operations. Here, three of the five Ottoman Army heavy artillery batteries in Palestine (the 72nd, 73rd and 75th Batteries) were deployed. Further, the Ottoman front line regiments had been alerted that a major attack was imminent.[33]
On 17 September 1918, Ottoman Army intelligence accurately placed five infantry divisions and a detachment opposite their Eighth Army. As a consequence, the 46th Infantry Division was moved up 8.1 miles (13.0 km) to the south–west to a new reserve position at Et Tire, directly behind the Ottoman XXII Corps's front line divisions.[33]
Claims have been made that the Ottoman armies were understrength, overstretched, suffering greatly from a strained supply system and overwhelmingly outnumbered by the EEF by about two to one, and "haemorrhaging" deserters.[28][34] It is claimed, without taking into account the large number of machine guns, the effective strengths of the nine infantry battalions of the 16th Infantry Division each was equal to a British infantry company of between 100 and 250 men while 150 to 200 men were assigned to the 19th Infantry Division battalions which had had 500–600 men at Beersheba.[23][Note 4] It is also claimed that problems with the supply system in February 1918 resulted in the normal daily ration in Palestine being 125 grains (0.29 oz) of bread and boiled beans in the morning, at noon, and at night, without oil or any other condiment.[35]
Tabsor defences
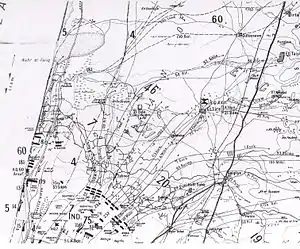
The Tabsor defences consisted of the only continuous trench and redoubt system on the front line. Here the Ottomans had dug two or three lines of trenches and redoubts, varying in depth from 1–3 miles (1.6–4.8 km). These defences, centred on the Tabsor village, stretched from Jaljulye to the coast. Another less developed system of defences was 5 miles (8.0 km) behind, and the beginnings of a third system ran from Tulkarm across the Plain of Sharon to Nahr Iskanderun.[36]
It has been suggested that an inflexible defence relying on a line of trenches had been developed by the Ottoman armies, which required every inch of ground ... to be fought for, when a more flexible system would have better suited the situation.[30]
Battle
Bombardment
"The infantry will advance to the assault under an artillery barrage which will be put down at the hour at which the infantry leave their positions of deployment. This hour will be known as the 'XXI Corps Zero Hour.' There will be no preliminary bombardment."[37]
Just as the preliminary attack by the 53rd Division, XX Corps on the Judean Hills front (see Battle of Nablus) was pausing, at 04:30 a bombardment by artillery, trench mortars and machine guns began firing at the German and Ottoman front and second lines of trenches in front of XXI Corps. Three siege batteries fired on opposing batteries while the destroyers HMS Druid and HMS Forester opened fire on the trenches north of Nahr el Faliq.[5][38]
This intense bombardment, which closely resembled a Western Front bombardment, continued for half an hour, with guns deployed one to every 50 yards (46 m) of front.[39][40][Note 5] The artillery was organised by weight and targets: heavy artillery was aimed at counter-batteries, with some guns and 4.5-inch howitzers shelling targets beyond the range of the field artillery's barrage and any places the infantry advance was held up. Meanwhile, the field artillery bombarded the Ottoman front line until the infantry advance arrived, then the 18–pounders and Royal Horse Artillery batteries lifted to form a creeping barrage in front of the infantry up to their extreme range. This barrage began firing at a range of 4,000 yards (3,700 m) but by 08:00 it had been extended to 15,000 yards (14,000 m) as the guns elevated and their firing range extended at a rate of between 50 to 75 yards (46 to 69 m), and 100 yards (91 m) per minute.[41][42] There was no systematic attempt by the artillery to cut the wire; the leading units were to cut it by hand or carry some way of crossing or bridging it.[43]
XXI Corps' attacks
While the 60th Division's attack on the coast was proceeding, the 75th Division on their right attacked the Tabsor defences, fighting its way towards Et Tire which they captured. On the right of the 75th Division, the 7th (Meerut) Division advanced north-eastwards towards the north of Et Tire to attack the defences west of Tabsor, while the 3rd (Lahore) Division, on the right of the 7th (Meerut) Division, advanced rapidly and seized the first line defences between Bir Adas and the Hadrah road. This division then turned eastwards to make a flank attack on the defences at Jiljulieh and Kalkilieh in the Judean foothills. Meanwhile, the 54th (East Anglian) Division on the right of the 3rd (Lahore) Division with the French detachment on its left, achieved their objective of establishing and acting as a firm pivot for the rest of the British infantry line, although they experienced strong resistance from Asia Corps.[44]
60th Division breach Ottoman front line
Letter written on 22 September 1918 by Captain R. C. Case, Royal Engineer, 313th Field Company, 60th Division[45]
180th Brigade capture of Nahr el Faliq
Twelve minutes after the artillery bombardment began, the 180th Brigade's three Indian infantry battalions attacked in two columns. The right column, led by the 50th Kumaon Rifles, captured Birket Atife and 110 prisoners along with eight machine guns. Then, advancing at a rate of 75 yards (69 m) a minute behind the artillery barrage, at 05:50 they captured redoubts and two succeeding lines of trenches, along with 125 prisoners and seven machine guns. Shortly afterwards, a further 69 prisoners were captured west of Birket Ramadan. The 2/97th Deccan Infantry following the Kumaon Rifles captured a redoubt, 40 prisoners and four machine guns.[46]
Meanwhile, the left column consisting of the 2nd Guides was caught by an Ottoman artillery barrage which caused 54 casualties before the leading companies reached the intact Ottoman wire, which was crossed. By 05:40 all three Ottoman trench lines were captured, with more than 100 prisoners.[43][47]
The bridge across Nahr el Faliq which carried the coast road was strongly defended, and it was not until 07:20 that the 180th Brigade's 2/97th Infantry from the right column was able to capture it, and a company established a bridgehead on the northern side of the mouth of Nahr el Faliq 5 miles (8.0 km) behind the Ottoman front line, providing the cavalry with safe passage northwards. The 180th Brigade had captured the front line defences and about 600 prisoners, while advancing 6,000–7,000 yards (5,500–6,400 m) north of their starting point, suffering 414 casualties. All wire entanglements on the beach were removed by the reserve battalion, the 2/30th Punjabis, so the 5th Cavalry Division could pass through a few minutes later.[47][48][49]
181st Brigade
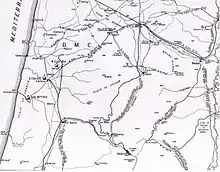
Having captured Nahr el Faliq and after providing the cavalry with the required breakthrough to advance northwards, the 60th Division then turned north-east towards Tulkarm, with the 5th Light Horse Brigade on its right flank.[50][51]
At 06:15 the 181st Brigade was ordered to advance to the north. The 181st had one machine gun section attached to each battalion, and the 2/97th Deccan Infantry in reserve. (Prior to this order to advance, the machine gun sections had formed part of the artillery barrage.) By 08:30 the leading troops of the brigade column had crossed Nahr el Faliq and the causeway at Kh. ez Zebabde.[47]
Then turning eastwards, their first objectives were to capture Ayun el Werdat and advance on Umm Sur 2 miles (3.2 km) further north. Both of these were captured by 11:00, by the 130th Baluchis and the 2/22nd Battalion, London Regiment, both of the 181st Brigade. Their next objective, prior to advancing on Tulkarm, was to take the Qalqilye to Tulkarm road. The battalions were supported by two 18-pounder batteries of the 301st Brigade Royal Field Artillery.[52][Note 6]
Ottoman defenders in the coastal sector
By 05:45 telephone communication to the Ottoman front had been cut and five minutes later all German and Ottoman reserves had been ordered forward.[53]
At 08:50, the Eighth Army's commander, Cevat reported to Liman von Sanders at the Yildirim Army Group headquarters at Nazareth, that the Ottoman 7th Division (XXII Corps, Eighth Army) was "out of the fight" and the 19th Division was under attack. Liman ordered the 110th Infantry Regiment to advance to support the Eighth Army. Meanwhile, a rearguard formed by 100 soldiers from the 7th Division armed with two machine guns and 17 artillery guns, and 300 soldiers from the 20th Division armed with four machine guns and seven artillery guns, made a desperate attempt to hold back the British Empire attack.[54][55] The rearguards established by the 7th and 20th Divisions continued to fight while retiring, the 7th Division establishing divisional headquarters at Mesudiye.[56]
Eventually, the 19th Division was forced to retreat towards Kefri Kasim, while the XXII Corps was in retreat towards Et Tire, having lost most of its artillery. The enemy has broken through our lines in spite of our counter–attacks ... Without assistance operations are impossible.[54][55]
By 12:00 Cevat was aware that British Empire infantry was advancing on his headquarters at Tulkarm, and by 16:30 that Et Tire had been captured. By dusk he had begun to move his headquarters north, having been finally and completely cut off from news and reports from his XXII Corps.[57]
181st Brigade with 5th Light Horse Brigade
As the 181st Brigade approached Tulkarm from the south-west, a number of aircraft bombed the town. The combined effects of the aerial attack and the approaching infantry resulted in many occupants leaving Tulkarm, and traveling along the road to Nablus. At 17:00 the 181st Brigade's 2/22nd Battalion, London Regiment with the 2/152nd Infantry on the right captured Tulkarm railway station and the town, while the 2/127th Baluch Light Infantry were held up at Qulunsawe. At Tulkarm 800 prisoners and 12 field guns were captured.[40][58]
The 5th Light Horse Brigade commanded by Brigadier General Macarthur Onslow with the 2nd New Zealand Machine Gun Squadron attached, had been instructed by the commander of the 60th Division to bypass Tulkarm if it was strongly defended, and cut the main road to Nablus from Tulkarm. This Australian and French cavalry brigade moved to the left, to clear the infantry battle and enemy machine gun fire opposing the 181st Brigade, and rode north of Tulkarm to eventually take up a position controlling the road to Nablus.[58]
About 21:00 a lieutenant, 23 troopers and two machine guns of the 5th Light Horse Brigade, guarding the road to Nablus, saw a long column approaching from the south. The light horsemen opened fire and stopped the column in the narrowest part of the road. After a brief discussion, between 2,000 and 2,800 Ottoman troops with between four and 15 guns surrendered to the Régiment Mixte de Marche de Cavalerie, 2,000 yards (1,800 m) north of the town.[40][58][59][Note 7]
Aftermath
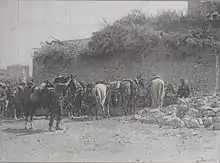
By the end of the day, the 60th Division had captured all its objectives, including the town of Tulkarm, which had been the site of the Eighth Army's headquarters, after a hard march of 17 miles (27 km) from their starting line.[60] By this time the Eighth Army commander was a fugitive, his army was in disarray, and his right flank was exposed, while the headquarters of the Desert Mounted Corps was bivouacked near Liktera many miles north, after successfully riding through the gap created by the infantry up the Plain of Sharon.[52][61][Note 8]
At 20:45 in the evening of 19 September, General Bulfin, commander of the XXI Corps, issued orders for the continuation of the advance. The objectives for the 60th Division on 20 September were to take up "a position facing generally north on the north side of the Tul Karm to Deir Sheraf road with their right on Jebel Bir 'Asur north east of 'Anebta and left at Shuweike north of Tul Karm."[62]
The 60th Division's 179th Brigade moved from Tulkarm towards 'Anebta, with the objective of capturing the railway tunnel near Jebel Bir Asur 2 miles (3.2 km) to the north-east. The 3/151st Punjab Rifles, with a squadron from the Composite Regiment, Corps Cavalry, a section of machine guns, and two 4.5-inch howitzers formed the advance guard, which quickly pushed small rearguards from ridges. The Punjab Rifles entered 'Anebta at 11:20 having captured 66 prisoners, and occupied the intact tunnel shortly after, while the 181st Brigade took up a defensive line north of the Tulkarm to 'Anebta road from the right of the 179th Brigade to the village of Shuweike.[63]
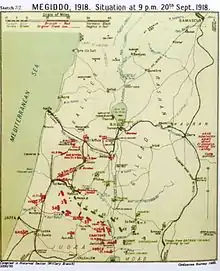
Meanwhile, at 02:00 on 20 September, the 5th Light Horse Brigade, less one squadron guarding prisoners, advanced from Tulkarm towards 'Ajee to cut the railway from Messudieh to Jenin. Two squadrons reached the railway 1 mile (1.6 km) north of 'Ajee where they blew up the line. The brigade was then ordered to move north to Jenin, but instead the brigade concentrated back at Tulkarm at 19:00, having captured 140 prisoners and two machine guns.[48][64][65][Note 9]
During 19 September, the XXI Corps had destroyed the right wing of the Ottoman front line, capturing 7,000 prisoners and 100 guns. Remnants of the Eighth Army which had escaped were captured the next day by Desert Mounted Corps at Jenin, in the Esdrealon Plain to the north of the Judean Hills. On 19 and 20 September the XXI Corps suffered total of 3,378 casualties of whom 446 were killed. They had captured 12,000 prisoners, 149 guns and vast quantities of ammunition and transport. With the exception of the Asia Corps, the whole Eighth Army had been destroyed.[66]
Notes
- See the Battle of Nablus (1918) for a detailed description of this corps' and Chaytor's Force' operations in the eastern Judean Hills and further east to Es Salt and Amman.
- The 91st Heavy Battery was pulled by horses, while the 380th Siege Battery was pulled by tractors; these batteries arrived at Tulkarm about 03:30 on 20 September. [Falls 1930 Vol. 2 p. 484]
- This Corps had held Beersheba at the time of the successful British Empire attack. [Erickson 2007 p. 146]
- There has been no detailed analysis of the impact of the high number of machine guns on the army group's strength.
- This compares with one gun to every 10 yards (9.1 m) on the Western Front. [Bou p. 194]
- Dudley Russell with the 97th Deccan Infantry was awarded the MC for an attack on the Tabsor system of trenches. It appears from Falls Map 20 and his description of the fighting that this unit advanced up the coast to Nahr el Faliq to the north of Tabsor before turning inland to capture Ayun el Werdat and Umm Sur. [Falls 1930 Vol. 2 pp. 486–7]
- It's been claimed the 5th Light Horse Brigade captured Tulkarm at 15:30 and 2,700 prisoners, 17 guns and vehicles, and that in the process, the brigade commander had fallen out with two of the regimental commanders, also with his Brigade Major. [Hall 1975 p. 111]
- The only available German and Ottoman sources are Liman von Sanders' memoir and the Asia Corps' war diary. Ottoman army and corps records seem to have disappeared during their retreat. [Falls 1930 Vol. 2 pp. 494–5]
- It has been claimed that the brigade rode all night, to cut the enemy frontline railway close behind Nablus. A few hours later, the Brigade captured Nablus itself. [Gullett 1919 p.33–6]
Citations
- Woodward 2006 p. 190
- Bruce 2002 p. 207
- Allenby letter to Wilson 24 July 1918 in Hughes 2004 pp. 168–9
- Gullett 1919 pp. 25–6
- Wavell 1968 p. 205
- Wavell 1968 p. 203
- Woodward 2006 p. 191
- Falls 1930 Vol. 2 p. 448
- Woodward 2006 pp. 190–1
- Blenkinsop 1925 pp. 236, 241
- Wavell 1968 pp. 197–8
- Falls 1930 Vol. 2 Part II pp. 455–6
- Wavell 1968 pp. 198–9
- Maunsell 1926 p.213
- Carver 2003 p. 232
- Bruce 2002 p. 216
- Falls 1930 Vol. 2 Part II pp. 455
- Wavell 1968 pp. 198–9, 208–9
- Preston 1921 pp. 200–1
- Keogh 1955 pp. 242–3
- Keogh 1955 pp. 243–4
- Falls 1930 Vol. 2 p. 484
- Erickson 2007 p. 132
- Keogh 1955 p. 242
- Carver 2003 p. 231
- Erickson 2001 p. 196
- Keogh 1955 pp. 241–2
- Wavell 1968 p. 195
- Falls 1930 Vol. 2 Sketch Map 30
- Bou 2009 p. 192
- Erickson 2007 pp. 142–3, 145
- Erickson 2007 p. 146
- Erickson 2007 p. 145
- Bou 2009 pp. 192–3, quoting Erickson 2001 pp. 195,198
- Erickson 2007 p. 133
- Hill 1978 p. 165
- Force Order No. 68 quoted in Woodward 2006 p. 193
- Falls 1930 Vol. 2 p. 485
- Bou 2009 p. 194
- Powles 1922 p. 239
- Falls 1930 Vol. 2 pp. 470–1, 480–1, 485
- Bruce 2002 p. 224
- Wavell 1968 p. 206
- Bruce 2002 pp. 224–5
- Woodward 2006 p. 196
- Falls 1930 Vol. 2 p. 485–6
- Falls 1930 Vol. 2 p. 486
- Wavell 1968 p. 207
- Carver 2003 p. 233
- Bruce 2002 p. 225
- Keogh 1955 p. 247
- Falls 1930 Vol. 2 pp. 486–7
- Erickson 2001 p. 198
- Erickson 2007 p. 148
- Erickson 2001 pp. 198–9
- Erickson 2007 p. 151
- Erickson 2007 p. 149
- Falls 1930 Vol. 2 p. 487
- Paget 1994 Vol. 4 pp. 263, 291
- Bruce 2002 p. 227
- Hill 1978 p. 168
- Falls 1930 Vol. 2 p. 504
- Falls 1930 Vol. 2 pp. 508–9
- Falls 1930 Vol. 2 pp. 504–5
- 5th Light Horse Brigade War Diary AWM4-10-5-2
- Falls 1930 Vol. 2 pp. 488, 509–10
References
- Bou, Jean (2009). Light Horse: A History of Australia's Mounted Arm. Australian Army History. Port Melbourne: Cambridge University Press. ISBN 978-0-521-19708-3.
- Bruce, Anthony (2002). The Last Crusade: The Palestine Campaign in the First World War. London: John Murray. ISBN 978-0-7195-5432-2.
- Carver, Michael, Field Marshal Lord (2003). The National Army Museum Book of The Turkish Front 1914–1918: The Campaigns at Gallipoli, in Mesopotamia and in Palestine. London: Pan Macmillan. ISBN 978-0-283-07347-2.
- Erickson, Edward J. (2001). Ordered to Die: A History of the Ottoman Army in the First World War. No. 201 Contributions in Military Studies. Westport Connecticut: Greenwood Press. OCLC 43481698.
- Erickson, Edward J. (2007). Gooch, John; Reid, Brian Holden (eds.). Ottoman Army Effectiveness in World War I: A Comparative Study. No. 26 of Cass Series: Military History and Policy. Milton Park, Abingdon, Oxon: Routledge. ISBN 978-0-203-96456-9.
- Falls, Cyril (1930). Military Operations Egypt & Palestine from June 1917 to the End of the War. Official History of the Great War Based on Official Documents by Direction of the Historical Section of the Committee of Imperial Defence. Volume 2 Part II. A. F. Becke (maps). London: H.M. Stationery Office. OCLC 256950972.
- Henry S. Gullett; Charles Barnet; David Baker, eds. (1919). Australia in Palestine. Sydney: Angus & Robertson. OCLC 224023558.
- Hall, Rex (1975). The Desert Hath Pearls. Melbourne: Hawthorn Press. OCLC 677016516.
- Hill, Alec Jeffrey (1978). Chauvel of the Light Horse: A Biography of General Sir Harry Chauvel, GCMG, KCB. Melbourne: Melbourne University Press. OCLC 5003626.
- Hughes, Matthew, ed. (2004). Allenby in Palestine: The Middle East Correspondence of Field Marshal Viscount Allenby June 1917 – October 1919. Army Records Society. 22. Phoenix Mill, Thrupp, Stroud, Gloucestershire: Sutton Publishing. ISBN 978-0-7509-3841-9.
- Keogh, E. G.; Joan Graham (1955). Suez to Aleppo. Melbourne: Directorate of Military Training by Wilkie & Co. OCLC 220029983.
- Maunsell, E. B. (1926). Prince of Wales’ Own, the Seinde Horse, 1839–1922. Regimental Committee. OCLC 221077029.
- Paget, G.C.H.V Marquess of Anglesey (1994). Egypt, Palestine and Syria 1914 to 1919. A History of the British Cavalry 1816–1919. Volume 5. London: Leo Cooper. ISBN 978-0-85052-395-9.
- Powles, C. Guy; A. Wilkie (1922). The New Zealanders in Sinai and Palestine. Official History New Zealand's Effort in the Great War. Volume III. Auckland: Whitcombe & Tombs. OCLC 2959465.
- Preston, R.M.P. (1921). The Desert Mounted Corps: An Account of the Cavalry Operations in Palestine and Syria 1917–1918. London: Constable & Co. OCLC 3900439.
- Wavell, Field Marshal Earl (1968) [1933]. "The Palestine Campaigns". In Sheppard, Eric William (ed.). A Short History of the British Army (4th ed.). London: Constable & Co. OCLC 35621223.
- Woodward, David R. (2006). Hell in the Holy Land: World War I in the Middle East. Lexington: The University Press of Kentucky. ISBN 978-0-8131-2383-7.
External links
- "5th Light Horse Brigade War Diary". First World War Diaries AWM4, 10-5-2. Canberra: Australian War Memorial. September 1918.